Nginx A+ SSL Configuration Using StartSSL
Introduction
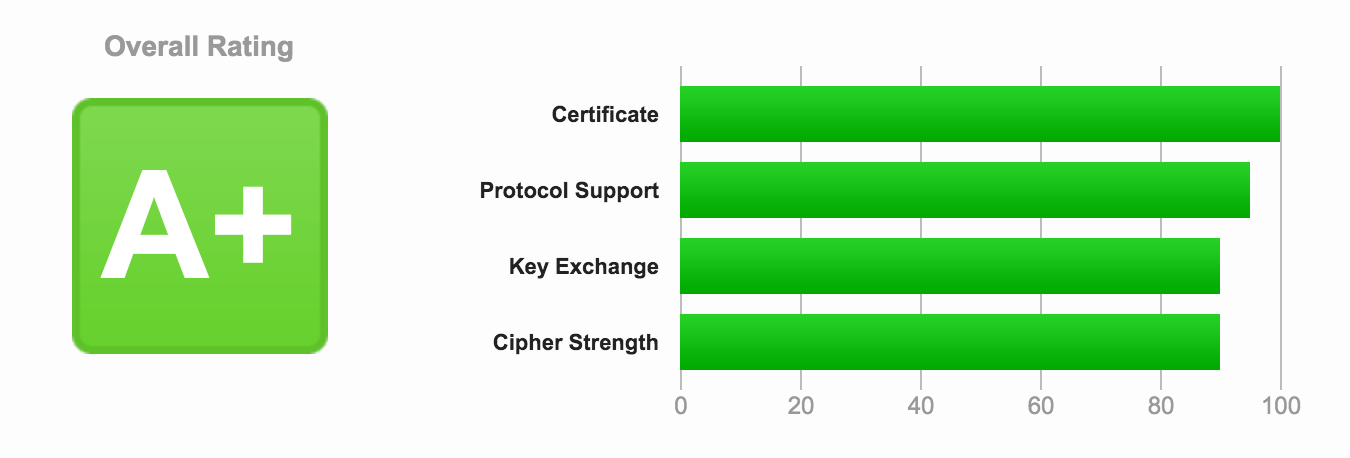
This post walks you through setting up SSL for your personal site for free using StartSSL on your nginx server. I’ve set it up on my DigitalOcean (DO) Ubuntu droplet but really this post has nothing that’s specific to DO. This will make your site run under HTTPS protocol and secure client-server communications for your site users. In addition we will make your site have an A+ rating for SSL configuration based on Qualys SSL Labs SSL site test results.
StartSSL is kind enough to provide free Class 1 SSL certificates for non-commercial use for free! Their root certificate is shipped with variety of browsers and operating systems so it’s highly unlikely your users would run into any problems when they access your HTTPS site. This is more than anyone needs to secure a personal site.
DigitalOcean has some amazing documentation but I couldn’t find one for setting up nginx with StartSSL. There is documentation in DO for setting up majority of the configuration but the rest is in bits and pieces in other blogs and sites so I thought this blog post would consolidate all that information in one place.
Step 1: Generate CSR & Private Key
The first step is to generate a Certificate Signing Request (CSR) and
a private key. This can be done using openssl from any machine, even
your local machine. It doesn’t have to be your DigitalOcean droplet
box. All you need to do is run the following command. If you don’t
have openssl or for some reason can’t get to a terminal to run the
openssl command there are lot of online CSR generators. A simple
Google search should get you there.
# replace finiteheap.com with your domain name below
openssl req -newkey rsa:2048 -nodes -keyout finiteheap.com.key -out finiteheap.com.csr
When you run the above command you will be asked bunch of questions. If you don’t know what the values should be, check Generate a CSR and Private Key section from this excellent DigitalOcean article: How To Install an SSL Certificate from a Commercial Certificate Authority. The output of the above command should create two files based on the domain name you provided which is the CSR and Private Key respectively. We will use both these files in later steps.
finiteheap.com.csrfiniteheap.com.key
Step 2: Generate StartSSL Certificate
Go to StartSSL and click on Control Panel button on the top right and select Express Lane. Fill all the form information and once you are past this you should see three tabs as shown below.
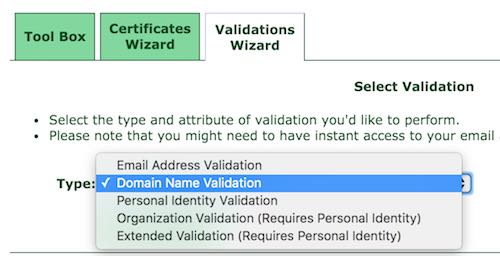
The first thing we need to do is to let StartSSL know that you own the domain. You can do either email validation or domain validation, both should be fairly easy. You can’t move forward without this validation step so make sure to finish this step.
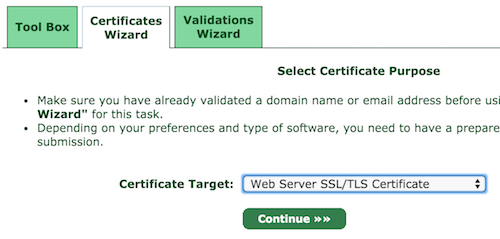
The next action is to generate the certificate for your domain. Click on Certificates Wizard from the tabs and select Web Server SSL/TLS Certificate option. If you are asked to create a key skip it. We already created a private key (and CSR) from step 1.
Now open finiteheap.com.csr (or your domain CSR), from step 1, in a
text editor and copy the entire code and paste it in the CSR section
in StartSSL site. Once you submit this you will get a signed
certificate for your site. Save this code as finiteheap.com.pem. Now
we should have three files in total:
finiteheap.com.csrfiniteheap.com.keyfiniteheap.com.pem
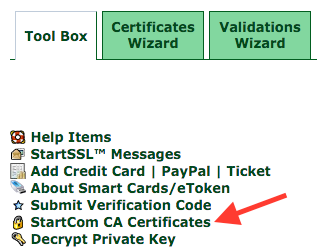
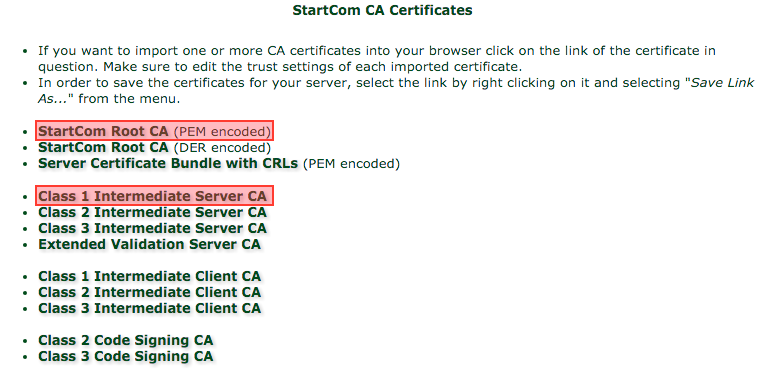
We need two more files - StartSSLs intermediate and root
certificates. You can get these from the Toolbox tab under
StartCom CA Certificates. You need the two .pem files
highlighted in the image below which are StartCom Root CA and
Class 1 Intermediate Server CA. Download and save them.
Step 3: Chain and Backup Certificates
You should have five files right now and these are the only ones we will be needing for your server.
finiteheap.com.csrfiniteheap.com.keyfiniteheap.com.pemsub.class1.server.ca.pemca.pem
You can combine (chain) all the three .pem files into one file to make
things easier so let’s go ahead and do that. You can either issue the
following command in terminal or just use text editor to combine them
into one file. When you combine the files the order matters here, so
pay attention.
cat finiteheap.com.pem sub.class1.server.ca.pem ca.pem > finiteheap.com.chained.pem
So your final chained finiteheap.com.chained.pem file would have
three sections like below - the first section is from
finiteheap.com.pem, the second from sub.class1.server.ca.pem and
the final one from ca.pem;
-----BEGIN CERTIFICATE-----
MjjsadIERmmfsdmnf/1FxU9nqs/vzANBgkqhkiG9w0BAQsFADB9MQswCQYDVQQGH
...
-----END CERTIFICATE-----
-----BEGIN CERTIFICATE-----
MIIF2TCCA8GgAwIBAgIHFxU9nqs/vzANBgkqhkiG9w0BAQsFADB9MQswCQYDVQQG
...
-----END CERTIFICATE-----
-----BEGIN CERTIFICATE-----
MIIHyTCCBbGgAwIBAgIBATANBgkqhkiG9w0BAQUFADB9MQswCQYDVQQGEwJJTDEW
...
-----END CERTIFICATE-----
You will have 6 files now. Now would be a good time to backup all these files to a secure location in case something have to happen to your server and you have to setup SSL again. Out of these 6 files we only need two of them in the server for our final SSL setup.
finiteheap.com.csrfiniteheap.com.keyfiniteheap.com.pemsub.class1.server.ca.pemca.pemfiniteheap.com.chained.pem
Step 4: Nginx SSL Configuration
Copy finiteheap.com.key and finiteheap.com.chained.pem to your
Nginx server, in my case it was my DO droplet machine that has nginx
running. You can create a folder named ssl if it already doesn’t
exist in /etc/nginx/ location to store your SSL related files and
move the two files into this folder. You can move the rest of files
into this location as well if you want them all in once place but they
are not really necessary for our server configuration.
venk@digitalocean:/etc/nginx/ssl$ ls
finiteheap.com.key
finiteheap.com.chained.pem
Now update your nginx site configuration located in
/etc/nginx/sites-enabled. I only have one site configuration in my
instance and this is the code inside it.
venk@digitalocean:/etc/nginx/sites-enabled$ ls
finiteheap.com
venk@digitalocean:/etc/nginx/sites-enabled$ cat finiteheap.com
server {
  listen 80;
  server_name finiteheap.com www.finiteheap.com;
  rewrite ^ https://$http_host$request_uri? permanent;
}

server {
    listen 443;
    server_name finiteheap.com www.finiteheap.com;
    root /var/www/finiteheap.com/html;
    index index.html index.htm;

    ssl on;
    ssl_certificate /etc/nginx/ssl/finiteheap.com.chained.pem;
    ssl_certificate_key /etc/nginx/ssl/finiteheap.com.key;
    ssl_session_timeout 5m;
    ssl_protocols TLSv1 TLSv1.1 TLSv1.2;
    ssl_ciphers "ECDHE-RSA-AES128-GCM-SHA256:ECDHE-RSA-AES256-GCM-SHA384:ECDHE-RSA-AES128-SHA256:ECDHE-RSA-AES128-SHA:ECDHE-RSA-AES256-SHA384:ECDHE-RSA-AES256-SHA";
    ssl_prefer_server_ciphers on;
    add_header Strict-Transport-Security "max-age=63072000; includeSubdomains; preload";

    location / {
            try_files $uri $uri/ =404;
    }
}
The first block (lines 1-5) makes your server rewrite HTTP to HTTPS URLs. So if your site user types in http://mydomain.com or http://www.mydomain.com in the browser URL, the user will get redirected to https:// version of it.
You can modify your existing configuration to copy only the necessary items from the code above or copy the whole thing displayed above into your file and replace the domain and paths that are specific to yours. Save your configuration and restart nginx.
venk@digitalocean:/etc/nginx/sites-enabled$ sudo service nginx restart
When you head on over to your site now, you should see a lock icon in your browser URL bar indicating that the site has HTTPS and your certificate is valid.
Step 5: Sanity Checks
Qualys SSL Labs site has a free SSL configuration checker that you can use to verify your SSL configuration and see if it’s up to date on all standards. Head on over to SSL Server Test and enter your URL and see what your rating is. It should probably show an A+ grade. But if not the site tells you what things needs to be addressed and a Google search will let you know how to fix it.
Congratulations! You are all set with SSL for your site.